- ×
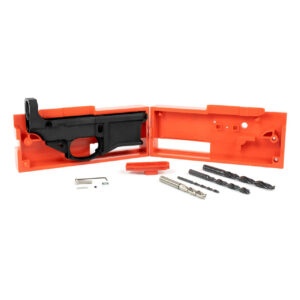 Polymer80 AR15 80% Receiver w/ Jig Kit - Black 1 × $60.99
 - ×
 Polymer80 P80-JIG-RL556v3 Jig Kit 1 × $50.99
Subtotal: $111.98
Polymer80 AR15 80% Receiver w/ Jig Kit - Black 1 × $60.99Polymer80 P80-JIG-RL556v3 Jig Kit 1 × $50.99Subtotal: $111.98
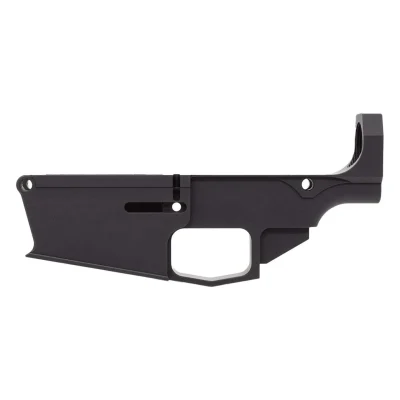
An 80 percent lower receiver is a partially completed firearm part that is designed to be finished by the end user. It is not considered a firearm by the ATF and can be purchased without a background check. These receivers are usually made from billet aluminum, which is a strong and lightweight material commonly used in firearms.
When purchasing an 80 percent lower receiver, it is important to ensure that it is compatible with your desired AR build. Some common AR build types include the AR-15, AR-10, and AR-9. It is also important to check the dimensions and specifications of the receiver to ensure it will fit with your other parts.
Some popular brands of 80 percent lower receivers include Anderson Manufacturing, Polymer80, and Aero Precision. These companies offer a variety of options in terms of materials, finishes, and compatibility with different AR builds.
It is important to note that finishing an 80 percent lower receiver requires some technical knowledge and tools, such as a drill press and milling machine.
Building an 80% lower receiver is a process that involves taking a pre-machined receiver that is 80% complete and finishing the remaining work to make it function as a legally compliant firearm lower receiver. This can be done at home, but it’s essential to understand the process, the laws involved, and to take proper safety precautions.
Before proceeding, make sure you are familiar with the local, state, and federal laws regarding the construction of firearms. In some regions, building or possessing an 80% lower may require registration or could be restricted. Always comply with the applicable laws in your jurisdiction.
To finish an 80% lower receiver, you will need specific tools to machine out the necessary areas. Common tools and supplies include:
– **80% lower receiver** (typically made of aluminum or polymer)
– **Drill press** (or a milling machine, though a drill press is often sufficient for most 80% lowers)
– **End mill bits** (usually 3/8″ or 1/4″ diameter, depending on the type of work)
– **Drill bits** (various sizes for pilot holes, trigger group holes, and pin holes)
– **Calipers or micrometer** (to measure precision)
– **Jig system** (a guide to help ensure correct drilling and milling)
– **Safety gear** (eye protection, hearing protection, and gloves)
– **C-clamps** (for securing the lower to the jig)
– **Lubricant** (cutting oil or general-purpose oil for machining)
– **Router or Dremel tool** (optional for finer detail work)
– **Hand tools** (like files and sandpaper for smoothing edges)
#### **2. Prepare Your Workspace**
– Set up your workspace with adequate lighting and ventilation.
– Make sure you have a stable, flat surface for your drill press or milling machine.
– Always wear safety gear to protect yourself from flying debris and sharp edges.
Most 80% lowers come with a jig (or you can buy one separately). The jig ensures that you drill the proper holes in the right locations and gives you a guide for milling the fire control pocket.
– Clamp the jig securely to your lower receiver.
– The jig typically has markings to indicate where to drill the trigger and hammer pin holes, as well as other key locations. Double-check alignment.
This is the most important step in completing the lower receiver.
– **Drill the pilot holes**: Most jigs will have a template that shows where to drill. You’ll need to drill through the fire control pocket area to remove material for the trigger group.
– **Use a drill press**: Set the drill press to the correct speed and carefully drill through the aluminum using the appropriate drill bit size. Start with a smaller drill bit to create pilot holes.
– **Mill the fire control pocket**: After the pilot holes are drilled, you’ll need to use an end mill or router to finish the pocket. The fire control pocket is where the trigger, hammer, and other internal components will be placed.
– Take your time to ensure precision, as the fire control pocket must be the right depth and shape to function properly.
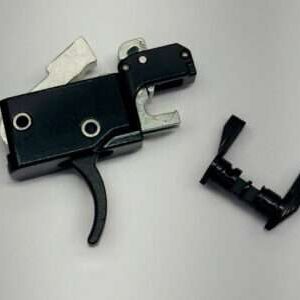
After the fire control pocket is done, you will need to drill several holes for the trigger pin, hammer pin, selector switch, and bolt catch.
– **Trigger and hammer pin holes**: Use the proper drill bit size and carefully drill out the pin holes. Be sure they are aligned and straight.
– **Selector switch hole**: Drill the hole for the safety selector switch according to your lower’s design.
– **Bolt catch and magazine release holes**: Drill these holes to mount the bolt catch and the magazine release mechanism.
Once all the critical drilling and milling are complete, use hand tools like files or sandpaper to smooth out any sharp edges. This ensures that the finished lower receiver fits together well and doesn’t have any burrs that could interfere with assembly.
– After the lower is finished, inspect all holes for correct placement and depth.
– Assemble the lower with parts like the trigger, hammer, selector switch, and pins to make sure everything fits correctly.
– Test the fitment of the components to ensure smooth operation and safety.
– If required by your jurisdiction, you may need to serialize the lower receiver and apply any other finishing marks that are mandated by local law.
– Depending on your jurisdiction, you may need to keep the lower unassembled or it may be legal to fully assemble it and use it as part of a functioning firearm.
– **Patience is key**: Building an 80% lower receiver is a precision task that requires attention to detail. Take your time and don’t rush.
– **Follow all safety protocols**: Always ensure that your tools are in good condition, and always operate them according to manufacturer instructions.
– **Consider professional help**: If you’re unsure or uncomfortable with any part of the process, consider getting assistance from a professional machinist or using an experienced friend’s tools.
### **Legal Disclaimer**
This process assumes that you’re building a firearm for lawful purposes, in compliance with all federal, state, and local regulations. In some jurisdictions, the process of building or possessing an 80% lower receiver may require a background check, registration, or other legal steps. Always verify and comply with the law before starting such a project.
Building an 80% lower receiver can be a rewarding and educational experience for firearm enthusiasts, but it requires a steady hand and attention to detail. Always prioritize safety and legal compliance.


Reviews
There are no reviews yet.